Sunday, 29 April 2007

Week 7 – Forum – Gender and Music Technology (1)

Well this was an uncomfortable forum. I know exactly how the girls would have felt being a minority with the majority telling them why they are there or even how they think. Really, it wouldn’t have been any different if we discussed why there are very few Aboriginal people in the industry. I doubt it’s got anything to do with women being inadequate, incapable or not politically driven. Maybe they’re just not interested. It’s probably that simple. To generalise that men do the work and ‘tinker’ with things therefore make them better users of technology is pretty ignorant. The simple fact is more likely to be that women just aren’t interested. Period. ‘Interest’ should be the question here. Not how many wombats one can hunt or how many clocks one can tinker with. If women were interested in music technology in a big way, they’d no doubt run rings around a lot of guys. Half the guys I see around town think they’re engineers, but I’ve often heard the question “how do you use a compressor?” for example. Most engineers who don’t know their craft intimitely try to fake it to make themselves look good or act like ignorant apes on the job with egos the size of Jupiter. Women don’t do this. They’re not afraid to ask for help.
I’ve been called a girl on the job before by fellow engineers. Apparently I was a girl because I asked for help in setting up a Midas console for monitoring and patching in some racks for it at a concert at Thebarton Theatre. Unbelievable, and he refused to help me and so I had to figure it out myself and then got yelled at because they were waiting for it to be put together. In the end (just for people’s interest) I couldn’t do it and told the guy to f**k himself and help me and stop being a dick. Men are wankers to work with and yes I’ve been known to be a wanker too.
Anyway, at the end of the day an equaliser is an equaliser and a compressor is a compressor so no matter what gender uses it, it will work the same and do the same job depending on their skills. So to finish up I'll quote Jacob. "Do we need to care?"
-

Whittington, Stephen. 2007. Forum Workshop “Can You Tell the Difference? - Gender in Music technology”. Forum presented at the University of Adelaide, 26th April.

Probert, Ben. 2007. Forum Workshop “Can You Tell the Difference? - Gender in Music technology”. Forum presented at the University of Adelaide, 26th April.
Loudon, Douglas. 2007. Forum Workshop “Can You Tell the Difference? - Gender in Music technology”. Forum presented at the University of Adelaide, 26th April.

Sincock, Amy. 2007. Forum Workshop “Can You Tell the Difference? - Gender in Music technology”. Forum presented at the University of Adelaide, 26th April.

Morris, Jacob. 2007. Forum Workshop “Can You Tell the Difference? - Gender in Music technology”. Forum presented at the University of Adelaide, 26th April.

Saturday, 28 April 2007

Week 7 - CC1 - Desktop Music Environment

Bleh! A keyboard player I am not. I copy/pasted the Marshall phrase and chose Trinoids for the voice. I had a listen to all of them and they’re all pretty bizarre. I chose the phrase “Behold” for C2, “We shape” for C3, “tools” for C4 and “us” for C5. “Behold” also had a loop set across the phrase “old.” Root keys were set and the samples saved then imported into Reason. I played around with a few of the parameters in Reason like the filters and prepared to play a tune. Meh, I didn’t really do too well in the playing department and I’d agree with anyone that says this soundscape sounds ordinary.

I’m not sure if I did this assignment correct or not. For some reason (no pun intended) my four sounds wouldn’t appear on the keyboard as split octaves. They’d be layers, that I had to change by turning a little knob under the window in the NN-19, instead of being laid out side by side by octave on the keyboard. I was sure the sounds had to be laid out side by side so I’ve obviously messed up somewhere.
I’ve honestly only ever used Redrum in the past as the rest of Reason I couldn’t work out. This exercise seemed a little daunting to me and has helped fill in a few blanks with MIDI programming as in the past all I’ve ever done when I work with samplers (I’ve got SampleTank2) is to simply import a sound I recorded and trigger it from there without any root key settings or anything.
-
Haines, Christian. 2007. “Creative Computing.” Seminar presented at the University of Adelaide, 25th April.

Week 7 - AA1- Vocal Recording

In popular music, the vocals are the first thing people hear and make an immediate judgement on the quality of the whole song in that first split second. It’s the main thing people connect to.
Large diaphragm condensers are better so I used a U87. I simply read a sentence from the course outline. No eq, no double tracking, nothing. I didn’t even manage to get any pictures. I had the mic raised and angled slightly back to open the throat and to help projection. I’m really keen to try Michael Stravrou’s “Killer Vocal” technique[1] which involves riding the fader and staggering compressors, but unfortunately I didn’t have a separate vocalist with me. Besides, I didn’t have the nerve to pull the console apart to repatch it for the job.


Sound 1: six inches from mic.
Sound 2: 3 feet away from mic.
Sound 3: controlled a dynamic section by starting at 6 inches away and moving back to 12 inches away during the loud part.
Sound 4: this is basically the same as Sound 1 but with the high pass filter engaged on the M5. I started losing my sanity at this point too.
Sound 5: recording of a singing voice, or at least a vague attempt at singing.
Sound 6: don’t ask me why.

There was noise in the control room that is present on the recording, and of course I wouldn’t normally record open mics in there, but this was done out of necessity.Compression was applied to give it a final touch of ‘evenness.’
-
Fieldhouse, Steve. 2007. “Audio Arts 1 Seminar – Vocal Recording.” Seminar presented at the University of Adelaide, 24 April.

[1] Stavrou, Michael. “Chapter 14. Vocals too hot to handle.” In Mixing with your mind. Christopher Holder ed. Flux Research. 2003

Wednesday, 11 April 2007

Week 6 - Forum - Collaborations (3)

Well I was off colaborating with a CT machine on Friday to see if we can find a reason for the peanut in my head giving me grief so I missed this weeks forum. Anyway, I would have been very interested to hear about particular methods that were employed during and in obtaining an initial collaboration with people that one thinks is important in furthering a career. For example, after reading Edward Kelly’s blog, Luke Harrald’s presentation explored his writing of the soundtrack for the short film “The 9.13” and Edward’s interpretation stating “one must either become multi skilled or collaborate with others who have the skills” [1] seems to sum up exactly how I feel about collaborations. I think it’s pretty pointless, if trying to get a project off the ground, to collaborate with someone that has the exact same skills as yourself. I have found that finding the right people to collaborate with is difficult, but finding those people that have the skills you don't is essential in making a project successfull. It’s all about networking and getting into a network that will actually help me get to where I want to go. A great idea is not enough. After reading David Dowling’s blog I became aware of the style of electronic piece Luke Harrald had written. It sounded quite intriguing and I am now curious as to how the “algorithmic accompaniment” [2] was written.


Luke Harrald. 2007. Forum Workshop “Collaborations Pt 3”. Forum presented at the University of Adelaide, 6th April

David Harris. 2007. Forum Workshop “Collaborations Pt 3”. Forum presented at the University of Adelaide, 6th April

Poppi Doser and Betty Qian. 2007. Forum Workshop “Collaborations Pt 3”. Forum presented at the University of Adelaide, 6th Apri

Stephen Whittington. 2007. Forum Workshop “Collaborations Pt 3”. Forum presented at the University of Adelaide, 6th April

The 9.13. Dir. Matthew Phipps. Short Film. Adelaide, Australia, 2005.

[1] Kelly, Edward. 2007 “f – week 6 – collaboration revisited” http://giantvegetables.blogspot.com/ (11 April 2007)

[2] Dowling, David. 2007 “Forum – Wk 6 – “Collaborations Pt 3”” http://notesdontmatter.blogspot.com/ (11 April 2007)

Sunday, 8 April 2007

Week 6 – CC1 – Sequencing (3)

Although this kind of work is at times very art like it is still a job and working to a brief is part of that job. There can be an individual stamp on the work but it still needs to meet the requirements that the client specified. Enter the brief (the score) supplied by Christian. Hopefully I’ll actually get paid working to a brief one day.

For this soundscape I wanted to try a looped, trancy type thing where the different textures on the score would represent different loops. Everytime I’ve tried this sort of thing in the past, it’s ended up cheesy and sounding pretty terrible. Nevertheless, I figured I’d give it another go as my other soundscapes have been rather abstract. After about five hours of coming up with nonsense I’d just about given up on trying the looped idea when I thought of a slightly different approach. I tried making one loop and having different sounds enter and leave the soundscape as the score progresses. This worked much better and I came up with the basic structure in an hour. After a couple more hours of volume and panning automation, waveform chopping and lots of pitch shifting and time compression/expansion I was done.
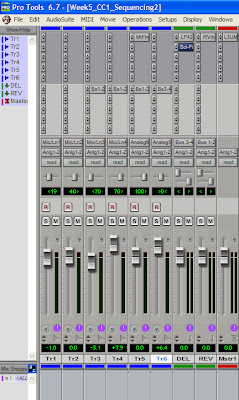
I used Grid mode to set the loop as can be seen in the picture, and I changed to Slip mode to squeeze sounds around the loop. I was a bit worried about the bass. The VU’s are pegged while calibrated at -15 but switching them to -6 has them hovering around -7dBVU so I’m assuming the levels would be safely around 0VU if I could check it at -12. 0VU = -12dBFS is still safe? Could you let me know if I am completely off the mark with this thinking. When I listened to it in headphones the vibration in the cans and the air rushing out of the sides didn’t seem healthy. The scramble for the volume knob as my eyes vibrated in their sockets certainly woke me up. I think I overdid it, but I think it sounds cool.


-
Haines, Christian. 2007. “Creative Computing.” Seminar presented at the University of Adelaide, 4 April.

Saturday, 7 April 2007

Week 6 – AA1 – Acoustic Guitar Recording

Recording a good sound. Yes, recording a good sound means having a good source to begin with. The guitar should be set up adequately for the sound. For example, if we are after a clean, bright sound then an excellent guitar with new strings, no rattling heads and the action set up with no fret buzz is esential. A good player is also recommended. If we are after a dirty, loose sound then older strings and a cheaper guitar may be the ticket. Microphone selection and placement is also a factor. Dynamic microphones have less presence and react slower to transients due to the moving coil design so may be a better choice for a grungy playing style while condenser microphones usually have an extended top end and are able to capture transients better.
A tight, close sound can be accomplished by pointing a small diaphragm cardioid condenser down toward the 14th fret about 10 to 20cm away. A deep, spacious sound can be achieved by placing an omnidirectional condenser away near the corner of a room to collect the bass frequencies.


Sound 1 used an SM57 to capture a grungy style of playing.


Sound 2 used a spaced pair to capture the sound in stereo. I donned headphones, and while listening to both microphones, moved the top one around until I got it in phase as best I could while listening for the “right piece of air.” [1]


Sound 3 used an MS technique. I’ve automated the Side mic to go from mono to stereo. The mid mic may look a little strange how it is situated, but it is set to omni.
Sound 4 was a single KM84 pointed at the bridge. I forgot to get a photo of this one. All the mics seemed to get breathing noise in them. Even the top one in the spaced pair. I'm not sure what else I could've done.

Sound 5 is a recording of one of my songs I did a few months ago in my lounge room. I’ve put this on here because it is a steel string acoustic and is a good contrast to the nylon string guitar. The two guitar tracks were recorded individually with a Rode NT3 with the mic pointing down toward the 14th fret about 10cm away from the fretboard. I couldn’t be bothered digging out the old session so try and imagine it without the artificial reverb.
-
Fieldhouse, Steve. 2007. “Audio Arts 1 Seminar - Acoustic Guitar Recording.” Seminar presented at the University of Adelaide, 4 April
-
[1] Stavrou, Michael. “Advanced Microphone Techniques.” In Mixing with your mind. Christopher Holder ed. Flux Research. 2003

Week 5 – AA1 – Introduction to Microphones

Microphones are a form of transducer. That means it turns an acoustic energy into electrical energy. The four microphone types we were introduced to were dynamic, condenser, ribbon and PZM.

Dynamic microphones are a passive device. A diaphragm is attached to a moving coil of wire suspended in a magnet. They are extremely durable but not as sensitive to transients and higher frequencies. Examples of dynamic microphones are Shure SM58, SM57 and Sennheiser MD421.

Ribbon microphones have a thin ‘ribbon’ made from a small strip of aluminium thinner than a human hair placed between polar opposites of a magnet. They always have a figure 8 polar pattern. Popular models are made by Royer and Coles.

Condensers work by sound pressure vibrating two charged plates. A preamp is needed to bring the level up to a usable volume. A DC voltage (commonly called phantom power) is needed to charge the plates. Common condenser models are Neumann U87, AKG 414 and RODE NT3.

PZM (pressure zone microphone) are boundary condenser microphones. They work by having an omni directional capsule covered by a plate which creates a hemispherical polar pattern.[1]


I found a horrible buzz on the radio to use as the continuous sound source.
Sound1 : MD421 5cm away from speaker slowly brought to 0cm away to judge proximity effect. I probably should have had a sound with lower frequency content for these examples.
Sound2: KM841 Same position as Sound 1 but judging with a condenser.
Sound3: KM841 but I start the mic at 90 degrees and go through 0 degrees to 270 degrees to judge the polar pattern. The mic is 5cm away from the speaker.
Sound4: C414 same test as Sound 3 but with an omnidirectional polar pattern. There is no difference in pickup.
Sound5: C414 same test again but with a figure 8 polar pattern.
Sound6: PZM starting 20cm away from the speaker and moved within 0cm. There is distinct phase shifting happening as the mic is moved closer and further away.

Fieldhouse, Steve. 2007. “Audio Arts 1 Seminar – Introduction to Microphones.” Seminar presented at the University of Adelaide, 28 March.

[1]paraphrased from: random trout “Audio Production I Notebook - Microphones” http://govguru.com/random/default.aspx (10 April 2007)

Tuesday, 3 April 2007

Week 5 - CC1 - Sequencing (2)

The fact that it is absolutely necessary to save all the folders of a complete Pro Tools session cannot be stressed enough by Christian. This includes the session file AND the audio files folder and to a lesser extent the fade files, although Pro Tools will recreate them if they are missing. We have been warned. I also think it’s a good habit to get into keeping any MIDI files, plugin patches and settings in with the song files in it’s own folder.

Since Digidesign’s Pro Tools is the industry standard in digital audio workstations it makes perfect sense that we will be performing a large part of our work using both LE and HD systems. Pro Tools’ user interface is split into two screens, mix window and edit window. By using these two windows we can alter, smash, twist, massage and prod sounds into nice little mixes. Well, maybe not that easy, but I have found that Pro Tools is very user friendly. Much easier to use than certain ‘logic-al’ DAW’s.

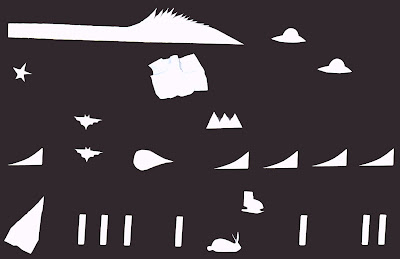
This week we are to go nuts with the automation. Do some consolidating, duplicating and routing through some busses. Automate some plugins as well as panning and volume changes. Use some RTAS and Audiosuite plugins. See a button and move it, click it, see what it does. I used photo editing so I could use the same shapes as last week to make the score. After making the score I set out to make the ‘music’ by the same method as before only this time the sounds were going to be altered and manipulated. One section on Track 3 had the pencil tool used set to 1/8th notes get a quick, even spacing of mutes. Some quick “bursts” on Track 6 had the reverse plugin, some time expansion and a phaser effect applied. There was a bit of cheesy ‘whooshy’ panning going on too.
-
-

Haines, Christian. 2007. "Creative Computing." Seminar presented at the University of Adelaide, 28 March.

Digidesign. 1996-2007 Avid Technology, Inc All Rights Reserved.